Product Description
In the supplier form, this row is used to set the Product Description:

In the "Description" field, it is allowed to fill in several price list columns, separated by a period, in order to combine their contents into a single text. Example:

As a result, the imported product description becomes:

a space between texts inserted automatically.
"Update description" Select
On the right side of the "description" row, as usual, there are update buttons:

The green color indicates a button or select that works only in update mode:
- "Never" - does not allow updating product description, but allows adding a description when adding a product
- "Always" - update the description every time the price list is processed
- "If it is higher quality" - compares the existing description with the price list description or parsing result by the number of lines, paragraphs, and the number of letters. If the new one is better, the old one is replaced.
- "If it is empty" - updates the existing description if it is less than 5 symbols.
- "By SEO template" - generate new description using more product data and custom text. You can read more about the SEO tab.
Field "Description default"
In this field, you can enter a free text that will be added as a product description in case the description is empty or not parsed.
If in the report, the plugin reports that the description was successfully added or updated, but in admin is empty, check the source encoding.
You can set the encoding here:

"Merge with the description" Select
Attaches an additional description from the price list or parsed to the existing product description. This additional description can be attached to an existing one, both before it and after it:

In this case, the setting "Update description" should be set to "Always".
"<br>" (new line) is automatically inserted between two descriptions
Product Description. Content
The description may contain images and videos. Enable this button:

Images
In the source(price list or parsed text), the image should be embedded with html tag <img . For example:

The plugin downloads the image from its URL
http://site.com/img/350.jpg
and saves it in the folder image/catalog/description on your site, changes the image file name, keeping the original image size:
<img src="../image/catalog/description/350.jpg" width="180" height="180" />
As a result, the image is displayed in your product description:

If the image sizes width and height are missing in the html code, the plugin will save it with size by default - 180px. You can change this by adding different sizes in the file admin/model/catalog/suppler.php. Find this part of the code:

Video
In the source(price list or parsed text), the video should be embedded with html tag <iframe>:
<iframe src="//www.youtube.com/embed/9XT8lcp5q8s" width="640" height="360"></iframe>
The plugin embeds the video without any changes.
New line
Often the description is added as a single line. This is due to the fact that in the source, the new lines were added with characters unfamiliar to OpenCart, for example, in Excel, this is the alt+Enter character. It turns out::

The tool "Find and Replace in product description" will help to slightly correct the situation. You need to find a pair of characters "dot + space" and replace them with a tag <br>:

(on the image above, in the "Find" field, the cursor is left visible to show the space after the dot).
"Create description by SEO template" button.
Starts with a red letter, this means that this button works only in the product add mode.
It is used in cases where there are no product descriptions or they are incomplete
The SEO template allows you to add custom words and texts, product attributes or option values, and other product data and thus enrich product descriptions.
- Read more about the SEO template here.
- Another tool to generate unique product descriptions is the Antiplagiator. Read more here.
Description editing tools
In the tab "Tools" there is a group of bulk editing functions:

1. The function removes the product descriptions along with tags, in the language that is currently enabled in the admin panel as the administrator's language.
The plugin updates/changes product names and/or descriptions only for the current admin language.
2. Removes all links in descriptions, excluding links to your own site and PDF links. Only the text remains, the link tags and the URL addresses are removed.
3. Removes from product descriptions a piece of text from word 1 to word 2 inclusive of word 1 and word 2.
4. Removes from product descriptions a piece of text after the word 1 - before the word 2. The text between words is deleted.
5. Before starting this function, you need to fill in the SEO template and save the supplier form. The old description will be deleted and replaced with the new one.
It is possible to keep the old description and only enrich it with new text. To do this, the SEO template uses the [d] tag, which denotes the old description.
Add text after the existing description:

Add text before the existing description:

Notice
If you use function 5 twice, the added text will be duplicated:

Product Description. Parsing
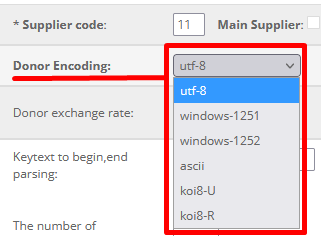
First check the donor site encoding:

Select it in the supplier form:
Example 1
The description is parsed exactly the same way as the product name. For example, part of the donor page looks like this:

The parsing parameters are underlined with red lines: id="tab-description">,</div></div> </div>
Set the supplier form this way:

As you can see, the description contains an image link (highlighted with a gray background), so if you do not want the plugin to remove it, you have to enable this button:

Example 2

There is a problem with the second parsing parameter - the end of the fragment. The </div> parameter is not suitable, because it is also found inside the description (underlined with a red line).
Spaces in the parameters are not reliable and not recommended to use, so it will not work and this
id="tab-description">,</div> </div>
You can't use the parameter class="tab-pane" either, since an unclosed <div will get into the description, which will lead to a page markup break.
In such cases, it is allowed to add a third parameter: id="tab-description">,</div>,</div> which means that there can be an unlimited number of spaces between the second and third parameters.
Example 3
The price list does not contain a link to a web page, but to a description file. When you click on the link, a formatted description text that does not contain HTML tags opens in the browser window.
In this case, you should use the following parsing parameters: *,*

Manufacturer
Manufacturers in admin
In OpenCart admin in the catalog menu, there is a special section where you can manually add manufacturers, which can then be selected when adding a product.:

Each manufacturer created here receives its ID - manufacturer_id, which, later on, is recorded in the product data.
A product may not have a manufacturer (this is not a mistake), however, for SEO, adding a manufacturer is a good practice. Unfortunately, in the default Opencart, there are not enough possibilities to add the manufacturer data (multilanguage description, meta title, meta description). There are other Opencart-based platforms that do it - ocStore, OPENCART.PRO, also some modules include this functionality:

Manufacturer in product
The plugin automatically adds a manufacturer to the product if the manufacturer is in the price list column and the number of this column is set in the supplier form in the "Manufacturer" row:

If the manufacturer is missing from the price list the plugin will add the default manufacturer set in the supplier form (see the image above). If a default manufacturer is not set the product will be added without a manufacturer.
The default manufacturer will be added only when in add mode(the setting name starts with a red letter).
When adding a product, the plugin can create its manufacturer on the site if it is not created already. You can enable this in the supplier form:

You have two settings depending on the form action
The button starting with a red letter works only in product add mode, the green one - only in update mode.
By default, the plugin creates a manufacturer in the store and generates its SEO URL by its name. If your installation supports the other manufacturer data you can set the SEO template to generate it:

On the fly manufacturer's name replacement
It often happens that the manufacturer in your store has a different name, not the same as in the price list or on the supplier's website. The plugin allows you to change the name of the manufacturer on the fly when adding it.
Using Excel create an xml table(use the format Excel 2003 XML Spreadsheet) with 2 columns:

Save it as manufacturer.xml and upload it in the admin/uploads folder on your server.
Manufacturers editing tools
In the "Tools" tab there is a group of brown-green color functions:

Basically, all tools are intuitive here.
1. The term "Fix" means the unconditional replacement of the old text with the new one. Provided that the new text from the SEO template is not empty.
The term "Fill in empty" means that the non-empty text from the SEO template will fill in the blank metadata.
2. Manufacturer's URL is automatically generated by the plugin from the name. All SEO standards are followed: special characters are removed, Cyrillic letters are transliterated into Latin lowercase letters, and spaces are replaced with hyphens. For example:
- Name: "Banana Republic"
- URL: banana-republic
If you have changed the name of the manufacturer in the admin panel, run this tool.
3. The plugin will not create manufacturers with the same name, but you can do it, intentionally to remove quasi-duplicates. For example:

If you rename the manufacturer Asus Corporation to Asus to get a duplicate, and then use function 3, then all products will be "moved" to one manufacturer, and the other one will be deleted.
Parsing
See parsing product name.
Product Image
OpenCart product images
When adding a product in Opencart you can assign to it two types of images:
- main image
- additional images
The main product image is recorded in the product table and the plugin can work with it - delete, replace. The additional product images are added to another database table without the plugin being able to work with any of them specifically.
It is impossible to find, replace or delete a specific photo among additional ones with this plugin.
Image files are stored in the image/catalog folder and sub-folders, and linked to the product through database records:

In our example, you can see that the product with ID 2768 main image is in folder image/catalog/palto and the file name is photo-main12.png
If you change the image file name in the image/catalog/palto folder, then you need to change it in the database, otherwise, the main product image will disappear on the site.
Distributing images into folders
The folder photo contains an image of not one product 2768, but the whole category "SLR" because when creating products, the plugin followed your instructions on the tab "Category and margin":
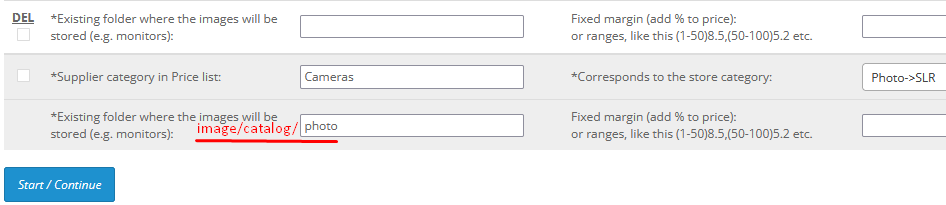
and uploaded product images from the category, which is indicated as "Cameras" in the price list, to the folder image/catalog/photo
In a nutshell
When processing the price list the plugin uploads the product images in a folder defined in the "Category and margin" tab according to the product category.
Impact on site speed
According to experts, if the photo folder contains more than 1000 files, the site starts to slow down, so the plugin has three ways to avoid folder overflow.
1. More different folders for different categories. Don't put all product images into one folder:
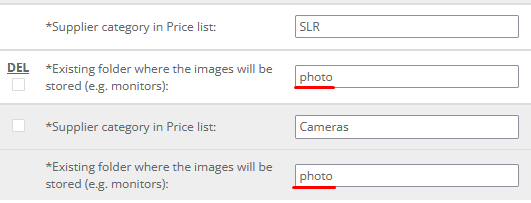
2. Divide each folder into 10 sub-folders:

When the "Add the images in subfolders..." button is enabled, the plugin will evenly distribute images into sub-folders: [0], [1], [2],...[9]
Distributing images in sub-folders follows this rule: The image is uploaded into the sub-folder number same as the last product ID number. In our example, this will be the sub-folder 8 because the product ID is 2768.
3. If needed, you can use the "Tools" to divide each sub-folder into 10 more sub-sub-folders:

Delete unused images
Image files are using the most disk space and the image folder is the largest folder on the site, but not all images stored in it are used in product pages.
Unnecessary, junk photos remain in the image folder after deleting images in products.
OpenCart removes only the image link in the database and does not remove the file itself in the folder, because this image could theoretically be used in another product.

The plugin has a tool called "Delete unused images from image folder":
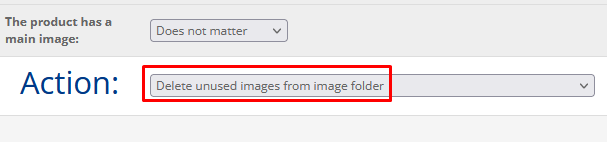
Make a copy of the database before using this tool.
The plugin checks all the products on the site and copies only the images associated with at least one product to a new empty folder. Thus, only the necessary images appear in the new image1 folder.
All preparation should be done on your PC.
- Download the image folder on your PC and do not delete it until the end of the process
- Create a folder image1 and copy the contents of the image folder into it.
- Empty the image1/catalog folder from files using the console command: del /s /q image1/catalog (restore deleted files that are not related to products: icons, languages, categories ...). Our goal is to keep the image folder structure and only the images that are used for the site design, icons, banners…
- Upload the image1 folder to the site root (next to the image folder).
- Run the tool "Delete unused images from image folder".
- When the action is finished, rename the image folder to image2 and the image1 folder to image
- Clean the cached images in image/cache/catalog.
- Go to the site to make sure that the product images are not missing.
- Delete the folder image2.
Product Image. Upload
The plugin provides 6 ways to upload product images depending on the price list content.
1. There is no image link in the price list and no link to the supplier's website page.
The plugin will not create a new product without an image. An error message will appear in the Report (file admin/uploads/errors):
Main photo not found. Row ~= "123" SKU = "AZ-12" Product passed
The line is skipped.
In order for a product without the main image to be created, you should specify a default image. The default image is used only in products that do not have an image in the price list. Or there is an image that is broken:

Column 8 (in this example) can point to an empty price list column, but in add mode, it must be specified so that the plugin does not generate an error.
It is recommended to upload a default image with low quality and small size so that in the future the plugin can replace this image with a better one:

It is a good practice to use no_image or no-image as a file name for the default image.
2. Direct image links
A direct image link is a link that, when clicked, opens an image in the browser. It can be either a link with extensions jpg/png/jpeg/gif/bmp/webp or a link without extension.
In the price list, links can be placed in separate columns or in one, but with a separator. For example:

(in column 5 you can see a link without extension, and in column 6 you can see that the links are separated with different separators).
In the "Column numbers containing links to the image" field, numbers are written, separated by commas. The order of the numbers matters only to determine what the main product image will be. If the main image is located in column 5, then you need to write it first:

If the link is broken, the plugin will display a message in the Report (admin/uploads/errors.tmp):
Download photo fails. Row ~= 12 Url = https:/site.com/PIC/170d.jpg
If the image from the link was successfully downloaded, but the folder for storing it was not specified on the "Category and margin" tab, the plugin will display a message:
Please, set folder for photo on page 'Category and margin' for Category 'название категории' Row ~= 12
(Create a folder for the image and write it down in the "Category and margin" tab, read more here).
3. Relative image links or image filenames
a)Links that do not contain a website address(don't include the domain name of the site), for example:

the missing part of the link should be filled in here:

b) Image filenames only:

In this case, image files have to be uploaded to the site in the folder image/catalog/temp

without sub-folders.
When assigning these photos to products, the plugin will copy them to the folders specified on the "Category and margin" tab, therefore, after price list processing, the temp folder can be emptied.
4. Product images parsing from a website's link
5. Separated image folders for each product
Note
This method only works for product update mode.
If in the price list, in the column "Image" there is plain text that does not contain any extensions jpg/png/jpeg/gif/bmp/webp neither slashes nor "http ", then the plugin considers this text as the folder name located in image/catalog/temp

For each product - a separate folder, each folder - a lot of images.
5. Attaching images to product
Note
This method works for both product add and update modes.
The price list directly indicates where the images are located on your site, for example:

and the images are already in this folder.
You should these settings:

Product Image. Parsing
Image parsing is different from text parsing. The description text or product name is a continuous text section of the web page code, and images (image links) can be separated from each other by considerable distances.
That's why we use "keywords".
A keyword is a text in the web page code that is no more than 500 bytes from the image link.
Part of the link cannot be used as a keyword: href, http, jpg, src…
The link can be active, inactive, full, or relative.
The keyword can be placed both before the image link and after it. For example:

Here, the keyword class="thumbnail" is placed before the image link.
In this case, you can parse the first image this way:

The occurrence number of the keyword class="thumbnail" is 1, and the link is to the right of the keyword. The keyword position is >1 (to the right of the first keyword occurrence).
Since the keyword class="thumbnail" is in front of every image on this page, and there are only 4 images on the page, in order to parse them all, you need to use the following settings:
class="thumbnail",class="thumbnail",class="thumbnail",class="thumbnail"

>1,>2,>3,>4

Parsing "Start,End" keywords
The image from the previous example could be parsed using the <li keywords. But <li texts are very common on the page - before the image, as well as after the image.

Parsing "Start,End" keywords show the plugin which part of the page to cut, so that later, in this part of the page look for the keywords <li
In this case, you can use the texts: class="thumbnails">,</ul> (underlined in red)

Product Image. Troubleshooting
Here are the most common problems that can arise when uploading/updating product images, which the plugin reports in the Report, in the admin/uploads/errors.tmp file.
Any photo not found.
Any photo not found. Row ~= 2 SKU = LGX135.ACISKW-12 Default photo expected
No images are found in the price list column 6,7,8 set in the supplier form:

check the price list columns and fix the form settings (in our example is 5,6,7)

Download main photo fails.
Download main photo fails. Url: http://8bits.com.ua/cat1.jpg Row ~= 2 SKU = LGX135.ACISKW-12
1. A broken link.
The plugin cannot download the image from the link http://8bits.com.ua/cat1.jpgbecause the link is broken. You can verify this by pasting it into your browser.:

2. The link contains illegal/unsafe/invalid characters
For example, a space substitute %20 to be replaced with a space
http://8bits.com.ua/image%20full/cat1.jpg
or vice versa, a space to be replaced with %20
http://8bits.com.ua/image full/cat1.jpg
If the link shows two hyphens in a row
http://8bits.com.ua/image--full/cat1.jpg
then most likely the second dash is a -
The plugin can fix links on the fly. To do this, you need to open the code and write what symbol in the link you need to change, and to what:
- open the file admin/model/catalog/suppler.php
- find this line: "заменить в ссылке на фото текст john на Sam"
- instead of john, write the text that you are changing, and instead of Sam, write the text on which you are changing
- remove the comment from the line in which the changes were done

Site no answer.
Row ~= 12 url = http://8bits.com.ua/cat1.jpg Site no answer
The most annoying error that happens when parsing images (and not just images) is when the site donor is protecting itself from your parsing, suspecting that you are carrying out a DDOS attack.
The problem occurs because of the speed with which the plugin on your site requests the donor site pages. A real person cannot view 2-3 site pages in 1 second. This looks like a DDOS attack.
The donor site can ban your site by IP, then you will have to look for another donor or parse from a file. If it's not too late, turn on the button:

Photo has not been write.
Row ~= 12 SKU = ACISKW-12 Can not create folder: "photo", create it manually
There is no folder on the server for this category. The folder "photo" was set in the "Category and Margin" tab, but was not created.

The plugin tried to create it, but it did not have enough permissions. Create the folder image/catalog/example/photo manually.
Please, set folder for photo.
Please, set folder for photo on page 'Category and margin'
Set image folder path for the product category in the "Category and Margin" tab:

this field is required.
Photo not parsed.
Photo not parsed: Row ~= 12 url = -1
Invalid keywords specified for image parsing. As a result, from the donor's site web page, the plugin parsed some text that did not look like a link.Read more about image parsing

Cyrillic symbols in the image link
The image is not loaded due to Cyrillic characters.
In the file admin/model/catalog/suppler.php find the text:
Убрать комментарий если ссылка кириллическая
Remove the comment and save the file:
