Suppliers List
Module First Page
When you open the module from the admin left menu, you will see the supplier forms list.

Every form is set for a specific price list from a specific supplier.
The price list structure is the arrangement of the product parts in columns, which means, which part of the product, in which column is located (the column number is used for the module settings).
The supplier form settings are saved in the database. Every time you change them you have to click the "Save" button.
Why "Supplier Form"?
Every form is used to work with a price list from a particular supplier.
You can have more than one form set for the supplier in order to perform different tasks.
And you can set more than one form to work with different price lists from a particular supplier.
Each supplier form has its own unique number, which is automatically assigned when a new form is created. This number never changes. Under this number, the supplier form is stored in your site database.

In order to bind a form to a supplier, assign an arbitrary number from 1 to 999 to each supplier and fill this number in the supplier form settings.

The supplier code is used to maintain the product-to-supplier relation. This is important when the product is updated, especially when one product is supplied from different suppliers.
Supplier Form. Headings
The supplier form interface is completely open, there are no hidden settings. Although not aesthetically pleasing, it is designed to avoid mistakes in form settings. Each setting is important and in case of an error, it is possible to add incorrectly entered products on the site.
Please check the settings carefully before running the form.

The form is used to:
- Mapping price list structure to product data
- Task control - there are different actions to choose
- Setting which product data to add/update based on the task
General form settings
From the image above you can find how to set your general form settings before mapping the product data.
1. Supplier form name (free text), for example: "ERC update". This name will appear in the supplier list.
2. Supplier number, from 1 to 999. You can set more than one form for the same supplier code if you need to perform different actions for the supplier products.
3. Main supplier (checkbox, optional). Products added by the main supplier form will be marked as belonging to the main supplier. In the product, the mark looks like a tilde "~" and is displayed in the Product Code on the site
The main supplier could be your own warehouse. No other supplier will be able to update the price and quantity of this product until the product is sold.
You can cancel the product belonging to the Main supplier by the "Force price update" action from another supplier form.
4. Store ID OpenCart allows for multi-store management using only one installation. The default store has ID 0. Every store in the multi-store has its own categories and product selection. When using the module we work with the particular store products.
5. Price list encoding The default Opencart encoding is utf-8. However, xml and csv price list formats may have encoding other than utf-8. If it is set incorrectly, the product names and descriptions on the site will be empty, although the plugin will report that they were added to the product successfully.
6. Donor encoding - Set it if you parse the product data from an external site and it is not utf-8 encoded.
7. Product code (Model) generation by a template. The Product code is a required OpenCart field. Our module can generate it.
Since the Model does not take part in the product identification (the product is identified by the article number - SKU), it can be an arbitrary text.
You can select one of the following generation templates.

Supplier Form. Tabs
The supplier form has 7 additional tabs.

1. Category and Margin tab is used to set the product category.
The product category in the price list can be indicated by any text, even by a number. We cannot require a supplier to match their category names with the names in our store, but we can match their category name with ours. This can be done using the "Category and Margin" tab.

The tab is filled from bottom to top. The separated category settings are visually divided with different backgrounds. After filling all the free strips of the tab, click Save, go to the tab again and continue filling.
To delete a strip, check the checkbox on the left [1] and click Save.
Depending on your price list this tab filling can be done also automatically.
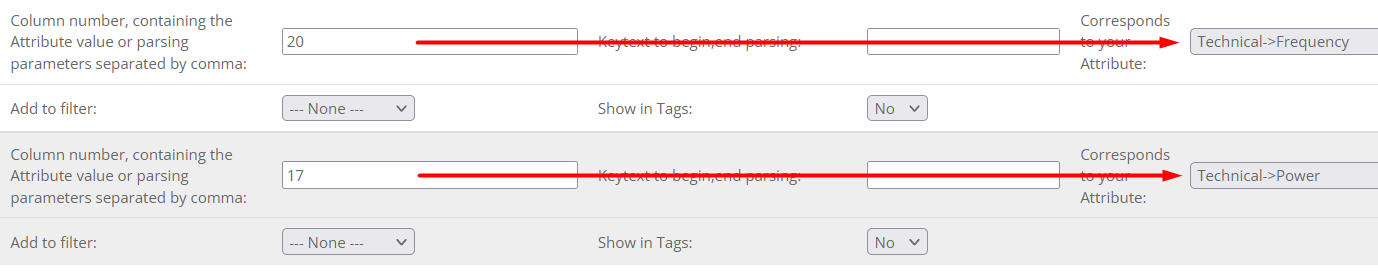
2. Attributes tab is used to add product attributes. Contains instructions to the plugin from which price list column the attribute value should be taken and to which store attribute to add this value.
The tab is filled from bottom to top. After filling all the free tab strips, click Save, go to the tab again and continue filling.
To remove an attribute setting, clear the attribute value field and click Save.
3. Options tab is used to add product options. Contains instructions to the plugin from which price list columns should take the option values, prices, and quantities.

The tab is filled from bottom to top. After filling all the free tab strips, click Save, go to the tab again and continue filling.
To remove an attribute setting, clear the option value field and click Save.
4. Competitors' prices tab is used to set the best product prices based on competitors' prices.
The plugin parses prices from competitors' websites and calculates the best price for each of your products. The purchase price is taken into account (to avoid a loss) and calculation instructions.
The price is set based on the results of comparing the prices of an unlimited number of competitors

The tab is filled from bottom to top. After filling all the free tab strips, click Save, go to the tab again and continue filling.
To remove a row, clear the column number field and click Save.
5. SEO template tab is used to set templates for generating meta-data for products, categories, and manufacturers.

6. Cron tab is used to specify the tasks that the plugin should perform at a certain time, automatically. For example, download the price list from a link and update the product prices and quantities in the store. In other words, to launch the supplier form.

7. Tools - works without a price list directly with the store database.
The tools have no settings. Each operation is performed once. You need to filter products by different criteria at the top of the page, select an action and click start.

Supplier Form. Inputs
The Supplier form is divided into horizontal stripes. Each row is responsible for a specific product part.

Price list exchange rate. A number with two decimals is used to multiply the price before using it on the site. You can also use the currency symbol if the currency is already set in the store (ex. USD, EUR, etc.).
Donor exchange rate. A number with two decimals is used to multiply the parsed from the external site price before using it on the site. You can also use the currency symbol if the currency is already set in the store (ex. USD, EUR, etc.).
Column number or parsing parameters. Fill the price list column numbers:
- If you need to list several columns, then they should be separated by commas without spaces
- If you need to combine texts from several columns into one text, then use a dot (see screenshot above)
- If the field contains at least one character other than a dot, comma, or number, then the plugin treats the field content as parsing parameters. In this case, you need to specify the price list column number, which contains a link to the product page on the donor site.
An example of setting parsing parameters:

Parsing parameters are two texts from the code of the donor site page, separated by a comma, between which is the needed fragment. For example, the price is 2099:

Column listing example:

In this example, the product images are in different columns.
Supplier Form. Radio Buttons
On the right side of the supplier form, in each row, there are radio buttons related to the product part presented in this row.
By default, all buttons are set for product add action from a price list file.
If the radio button name starts with a red letter, this setting is used when the product is added.
If the radio button name starts with a green letter, this setting is used when the product is updated.
SKU
"Make it primary." Button for replacing the article number (SKU) in the product

In the case of multiple SKUs, you can change the primary product SKU. Usually, this is used when you have a product from different suppliers in order to update the price or if the supplier has changed the product SKU.
Name
Button "Update product name"

If you enable it, the plugin will get the text from column 1 of the price list and replace the old product name.
The button name starts with a green letter, which means that this setting will be used only in product update mode.
Quantity
Button "Subtract stock"

Set subtract stock product/option setting.
Manufacturer

"Create in store" adds the manufacturer before it is assigned to the product. Generates the manufacturer's SEO URL. Works only when product is added.
"Update in product" replaces the product manufacturer.
Image
Button "Add the images in subfolders"

The plugin downloads images to the site using links from the price list or from the pages of the donor site and places them in folders in the image/catalog.
In order not to accumulate a lot of images in one folder (the site will slow down), the plugin has the ability to assign a separate folder to each product category. Image folders are set on the tab "Categories and margins"

However, if there are a lot of products in the category, then there may be too many images in the folder. The "Add the images in subfolders" button divides the folder into 10 sub-folders with the names "0", "1", "2" ... "9" and evenly distributes the images between them.
Thus, the image accumulation in one folder is reduced by 10 times.
The sub-folder for a specific product is selected by the last digit of its product_id
Supplier Form. Copy
Copy supplier form:
- open the form
- change the name of the supplier to the word "new" without quotes
- click "Save"
- go to form new, and right away change the name of the form and save it.

Supplier form export/import
- go to the "Tools" tab of the supplier form
- export the form to the admin/uploads folder
- transfer the admin/uploads/form.tmp file to another site in the admin/uploads folder
- go to the "Tools" tab of any supplier form on the new site
- perform this action

a new "Supplier Form" will appear in the list of forms.
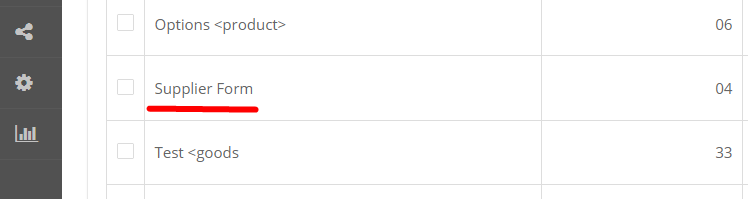
Open it and rename it however you like.
Be careful, the category, option, and attribute IDs can be different in the new site. Check the settings before using it.
SEO Template
The "SEO template" tab in the supplier form is designed to automatically fill in meta-data in products, categories and manufacturers, and also allows you to generate product image file names, default descriptions, and URLs.
The tab works both in add and update mode, depending on your settings:


If products, categories, or manufacturers were created without meta data, you can add them later using the "Tools" tab. Ex:

The SEO template fields may remain empty, this means that this tag in the product or category, or manufacturer will not be overwritten.
How to set the "SEO template" tab?
The rules for filling in the tab are intuitive, but there are still some nuances.:

A set in square brackets, consisting of words separated by a vertical bar "|" implies the use of only one of the listed words, randomly chosen. The number of words in square brackets is unlimited.
This way you can generate unique descriptions, meta titles, and meta descriptions:

For line break use: <br>
The numbers from 1 to 20 in square brackets refer to the "Random Text" table at the end of the SEO template:

This is the same list of random words but without square brackets. Here you can use nested constructs (indicated by an arrow). Nesting depth - up to 6.
Shortcode [d] - existing description
This shortcode represents the description that was already in the product before the SEO template processed it. For example, if the task is to add some text to an existing description:

and perform this tool:

Attention
If you run the "Fix product description using SEO template" tool twice, the result will look like this::
